
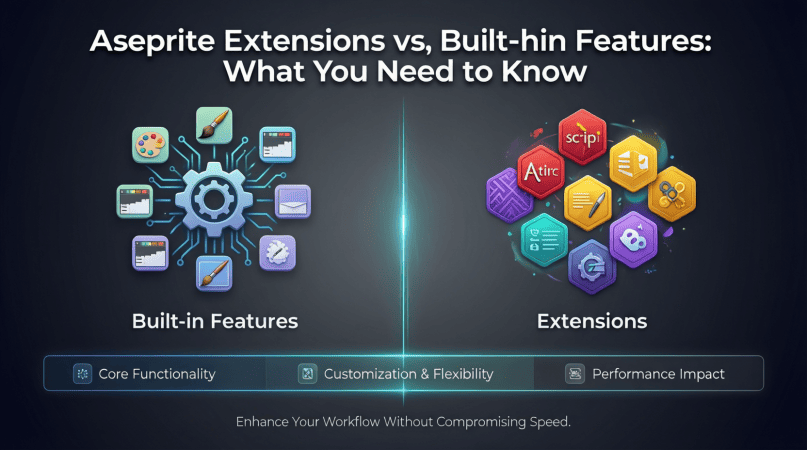
Aseprite Extensions vs. Built-in Features: What You Need to Know
Understanding Aseprite: A Brief Overview
Aseprite is a pixel art tool that has garnered a loyal following among game developers and artists alike. It offers intuitive features for creating animations and sprites, allowing for a smooth workflow. Its built-in capabilities are impressive, but the community-driven extensions can take your experience to a whole new level.
Built-in Features of Aseprite
Aseprite comes equipped with a range of built-in features that cater to both novice and experienced pixel artists. Here’s a breakdown of some of the most notable functionalities:
- Layer Management: Aseprite allows for the organization of artwork with layers, enabling artists to manipulate individual components without affecting others.
- Animation Tools: The built-in timeline and frame management tools make it easy to create smooth animations.
- Color Palettes: Aseprite supports an array of color palettes, allowing for quick access to your favorite color sets.
- Onion Skinning: This feature allows you to see multiple frames at once, aiding in the animation process.
- Export Options: Aseprite supports various export formats, including GIF, PNG, and sprite sheets.
Example: Using Built-in Layer Management
To effectively manage layers in Aseprite, follow these steps:
- Open your project in Aseprite.
- Navigate to the Layers panel.
- Click the ‘+’ icon to create a new layer.
- Use the eye icon to toggle visibility for each layer.
- Drag layers to reorder them as needed.
Aseprite Extensions: Unlocking New Possibilities
While Aseprite’s built-in features are robust, extensions can expand functionality, streamline workflows, and provide tools that cater to specific needs. Here’s a closer look at some popular extensions:
- Aseprite Scripts: Automate repetitive tasks with scripts tailored to your workflow.
- Pixel Art Tools: Extensions like “Aseprite Color Palettes” help manage and create color palettes more efficiently.
- Export Scripts: Custom export scripts can be designed to match your specific project requirements.
Step-by-Step Guide: Installing and Using Aseprite Extensions
To enhance your pixel art experience with Aseprite extensions, follow these steps:
- Visit the Aseprite extensions repository online.
- Download the desired extension files.
- Open Aseprite and navigate to File > Scripts > Open Scripts Folder.
- Drag and drop your downloaded extension files into this folder.
- Restart Aseprite to load the new extensions.
Comparing Built-in Features and Extensions
When deciding between built-in features and extensions, consider the following comparison:
| Feature | Built-in Features | Extensions |
|---|---|---|
| Ease of Use | Highly intuitive and user-friendly. | May require initial setup and familiarity. |
| Flexibility | Limited to what is provided by Aseprite. | Highly customizable based on user needs. |
| Community Support | Official support from Aseprite developers. | Community-driven support and updates. |
| Functionality | Core functions for general use. | Specialized tools for specific workflows. |
Checklist: When to Use Extensions vs. Built-in Features
Use this checklist to determine whether to utilize extensions or built-in features:
- Are you performing a repetitive task? Consider using a script extension.
- Do you need specific export options? Look for an export script tailored to your needs.
- Are you new to pixel art? Start with the built-in features for a smoother learning curve.
- Is your project becoming too complex? Explore extensions that can simplify workflow.
Related Content: Aseprite Extensions: Enhance Your Pixel Art Experience
For more details on how to enrich your pixel art experience with Aseprite extensions, check out our article: Aseprite Extensions: Enhance Your Pixel Art Experience.
Conclusion: Striking the Right Balance
In the world of pixel art, both Aseprite’s built-in features and extensions play critical roles. Understanding when to use each can significantly enhance your workflow and creative output. Whether you’re a beginner or a seasoned artist, leveraging the strengths of both will empower you to produce stunning pixel art.

beyerdynamic DT 770 PRO 80 Ohm Over-Ear Studio Headphones in Gray
beyerdynamic DT 770 PRO 80 Ohm Over-Ear Studio Headphones in Gray. Enclosed Design, Wired for Professional Recording and Monitoring
Razer
Razer Basilisk V3 Pro 35K Wireless Gaming Mouse: HyperScroll Tilt Wheel - 35K DPI Optical Sensor Gen 2-13 Customizable Controls - Chroma RGB - Optical Switches Gen 3 - Up to 140 Hr Battery - Black
Visual Studio Code Shortcuts Mouse Pad
Visual Studio Code Shortcuts Mouse Pad – Desk Mat for Programmers, Coders & Beginners, Great Office Gift for Developers & Tech Enthusiasts, Computer Accessory for Study, Work, and Learning KMH
KOORUI
KOORUI 24.5 Inch Gaming Monitor 200Hz, 1ms, FHD(1920 * 1080p) IPS Display, HDR400, 90% DCI-P3 Color Gamut with Adaptive Sync, HDMI & DP Port, Black, G2511P