
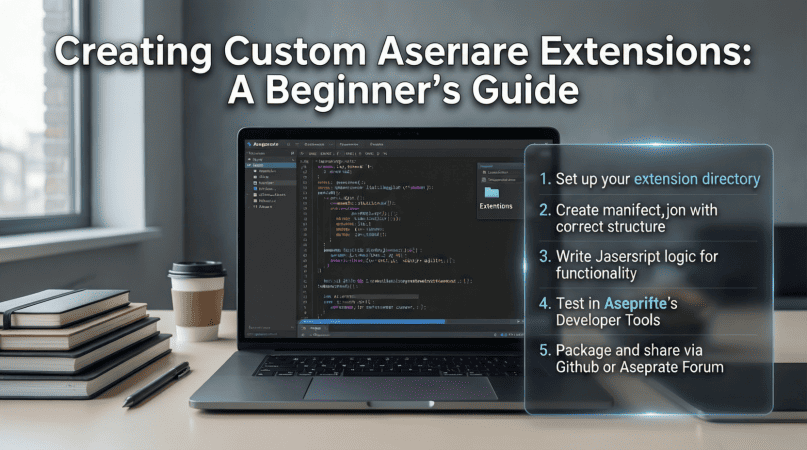
Creating Custom Aseprite Extensions: A Beginner’s Guide
Pixel art has become increasingly popular, not just for games but also for animations and illustrations. Aseprite is one of the best tools for creating pixel art, offering a plethora of features to streamline the workflow. However, if you’re looking to enhance your Aseprite experience, creating custom extensions can take your pixel art to the next level.
What Are Aseprite Extensions?
Aseprite extensions are custom scripts and tools that enhance the functionality of Aseprite. They allow artists to automate repetitive tasks, add new features, and generally improve their workflow. Extensions can range from simple scripts that perform basic functions to complex tools that integrate with other software.
Why Create Custom Extensions?
Creating custom extensions allows you to:
- Automate repetitive tasks to save time.
- Add features that fit your unique workflow.
- Integrate Aseprite with other tools you use.
- Enhance collaboration with team members through shared tools.
Getting Started with Aseprite Extensions
Before diving into creating your first extension, it’s essential to understand the basics of Aseprite’s scripting language, Lua. Aseprite supports Lua scripts, which means you can write custom scripts that interact with the software.
Setting Up Your Environment
To begin, you’ll need:
- Aseprite installed on your computer.
- Basic knowledge of Lua programming language.
- A text editor (such as Visual Studio Code or Notepad++).
Understanding the Aseprite Script Folder
Your custom scripts should be placed in the Aseprite scripts folder. Here’s how to find it:
- Open Aseprite.
- Go to Edit > Preferences.
- Navigate to the Scripts tab.
- Note the path to the scripts folder.
Creating Your First Aseprite Extension
Let’s start by creating a simple extension that automatically saves your work every few minutes, which can be a lifesaver during long sessions of pixel art creation.
Step 1: Create a New Script File
In your scripts folder, create a new file named auto_save.lua.
Open this file in your text editor and add the following code:
local function autoSave()
    local doc = app.activeDoc
    if doc then
        app.command.Save()
    end
end

app.timer(300000, autoSave) -- Auto-save every 5 minutes (300000 milliseconds)
Step 2: Save and Run Your Script
After saving the script, return to Aseprite:
- Go to File > Scripts > Reload Scripts.
- Your script should now be active and will auto-save every five minutes.
Testing Your Extension
To ensure your extension works correctly, create a new document, draw something, and test the auto-save feature. You should see your document saving automatically in the background.
Best Practices for Developing Extensions
When developing extensions, keep these best practices in mind:
- Keep your code organized and well commented.
- Test your extensions frequently to catch errors early.
- Utilize Aseprite’s API documentation for reference.
- Share your extensions with the community for feedback.
Advanced Techniques
Once you’re comfortable with basic scripting, consider exploring more advanced techniques, such as:
- Creating user interfaces for your extensions.
- Using external libraries to enhance functionality.
- Integrating your extensions with online resources or APIs.
Example: Creating a Simple UI
Here’s an example of how to create a simple user interface for your extension:
local dlg = Dialog("My Extension")

dlg:label{text="Choose a color:"}
dlg:color{ id="color", color="#FF0000" }

dlg:button{ text="OK", onclick=function()
    local color = dlg.data.color
    -- Do something with the selected color
end }

dlg:show()
Resources for Learning More
To further enhance your understanding of Aseprite extensions, consider the following resources:
Conclusion
Creating custom Aseprite extensions is an excellent way to enhance your pixel art experience and increase your productivity. With just a little bit of knowledge in Lua, you can automate tasks and create tools tailored to your own workflow. Start small, and as you grow more comfortable, explore more complex projects.
For more information on how Aseprite extensions can improve your pixel art experience, check out our related content: Aseprite Extensions: Enhance Your Pixel Art Experience.
KOORUI
KOORUI 24.5 Inch Gaming Monitor 200Hz, 1ms, FHD(1920 * 1080p) IPS Display, HDR400, 90% DCI-P3 Color Gamut with Adaptive Sync, HDMI & DP Port, Black, G2511P

Logitech G
Logitech G PRO X SUPERLIGHT 2 Wireless Gaming Mouse

Prebuilt Gaming Desktop Computer
Prebuilt Gaming Desktop Computer | 16G Memory | 512G SSD | AMD Ryzen5 6Cores 3.6G Up to 4.1G | RX 560 4G Graphics Card | Wi-Fi 6 | Gamer PC White
interface sounds OGG
interface sounds, UI sound effects, UX sound effects, game UI sounds, mobile UI audio, notification sound effects, button click SFX, menu sounds, toggle switch sounds, error alert sounds