In the digital age, effective web graphics can make or break your online presence. Whether you’re a seasoned designer or a newcomer, mastering Adobe Photoshop is essential for creating visually appealing graphics that engage and convert users. This article will guide you through the process of creating web graphics from scratch, providing tips, techniques, and best practices to enhance your design skills.
Understanding Web Graphics
Web graphics encompass various types of visual content used on websites, including:
- Logos
- Icons
- Background images
- Banners
- Infographics
Each graphic serves a specific purpose, whether it’s to enhance branding, convey information, or guide user actions. Understanding the role of each type of graphic will help you approach your design with clarity.
Getting Started with Photoshop
Before diving into graphic creation, ensure you have Adobe Photoshop installed on your computer. Familiarize yourself with the interface and tools. Here are some essential tools you will frequently use:
- Selection Tools: Use these to select specific areas of your design.
- Brush Tool: Perfect for adding artistic touches or textures.
- Shape Tool: Great for creating basic shapes and icons.
- Text Tool: Essential for adding text elements to your graphics.
Step-by-Step Guide to Creating a Web Banner
Step 1: Set Up Your Document
Open Photoshop and create a new document. For a standard web banner, a size of 728×90 pixels is commonly used.
- Go to File > New.
- Set the width to 728 pixels and the height to 90 pixels.
- Choose a resolution of 72 DPI for web graphics.
- Click Create.
Step 2: Design the Background
Start by creating a background that complements your message. You can use a solid color, gradient, or image.
- To apply a solid color, select the Paint Bucket Tool and click on the canvas.
- For a gradient, choose the Gradient Tool and drag across the canvas.
- To add an image, go to File > Place Embedded and select your image file.
Step 3: Add Text
Text is a crucial element in banners. Use the Text Tool to add a catchy headline or call to action.
- Select the Text Tool from the toolbar.
- Click on the canvas and type your text.
- Customize the font, size, and color from the top menu.
- Consider using a bold font for visibility.
Step 4: Incorporate Graphics
Enhance your banner with icons or images. You can find free resources online or create your own shapes.
- To create a shape, select the Shape Tool and draw it on the canvas.
- You can also import icons by going to File > Place Embedded.
Step 5: Final Touches
Review your design and make adjustments as necessary. Ensure that the text is readable and the overall composition is balanced.
- Use the Move Tool to adjust elements.
- Consider adding a drop shadow or stroke to text for better visibility.
Step 6: Save Your Banner
Once you’re satisfied with your design, save it in the appropriate format for web use.
- Go to File > Export > Save for Web (Legacy).
- Select the JPEG or PNG format.
- Click Save and choose your location.
Best Practices for Web Graphics
To ensure your graphics are effective, keep these best practices in mind:
- Optimize File Size: Large images can slow down your website. Use tools like TinyPNG to compress images without losing quality.
- Maintain Consistency: Use a consistent color palette and typography throughout your graphics to strengthen your brand identity.
- Make It Responsive: Ensure your graphics look good on all devices, adjusting sizes and compositions as necessary.
- Test and Iterate: Gather feedback and analyze performance metrics to refine your graphics over time.
Additional Resources
For more in depth knowledge about Photoshop and web design, check out our Ultimate Guide to Photoshop for Web Design. This comprehensive resource covers everything from basic tools to advanced techniques, helping you elevate your design game.
Conclusion
Creating web graphics with Photoshop is an essential skill for anyone involved in web design. By following the steps outlined in this article and incorporating best practices, you can create stunning visuals that capture your audience’s attention. Remember to keep learning and experimenting with different techniques to continually improve your design skills.
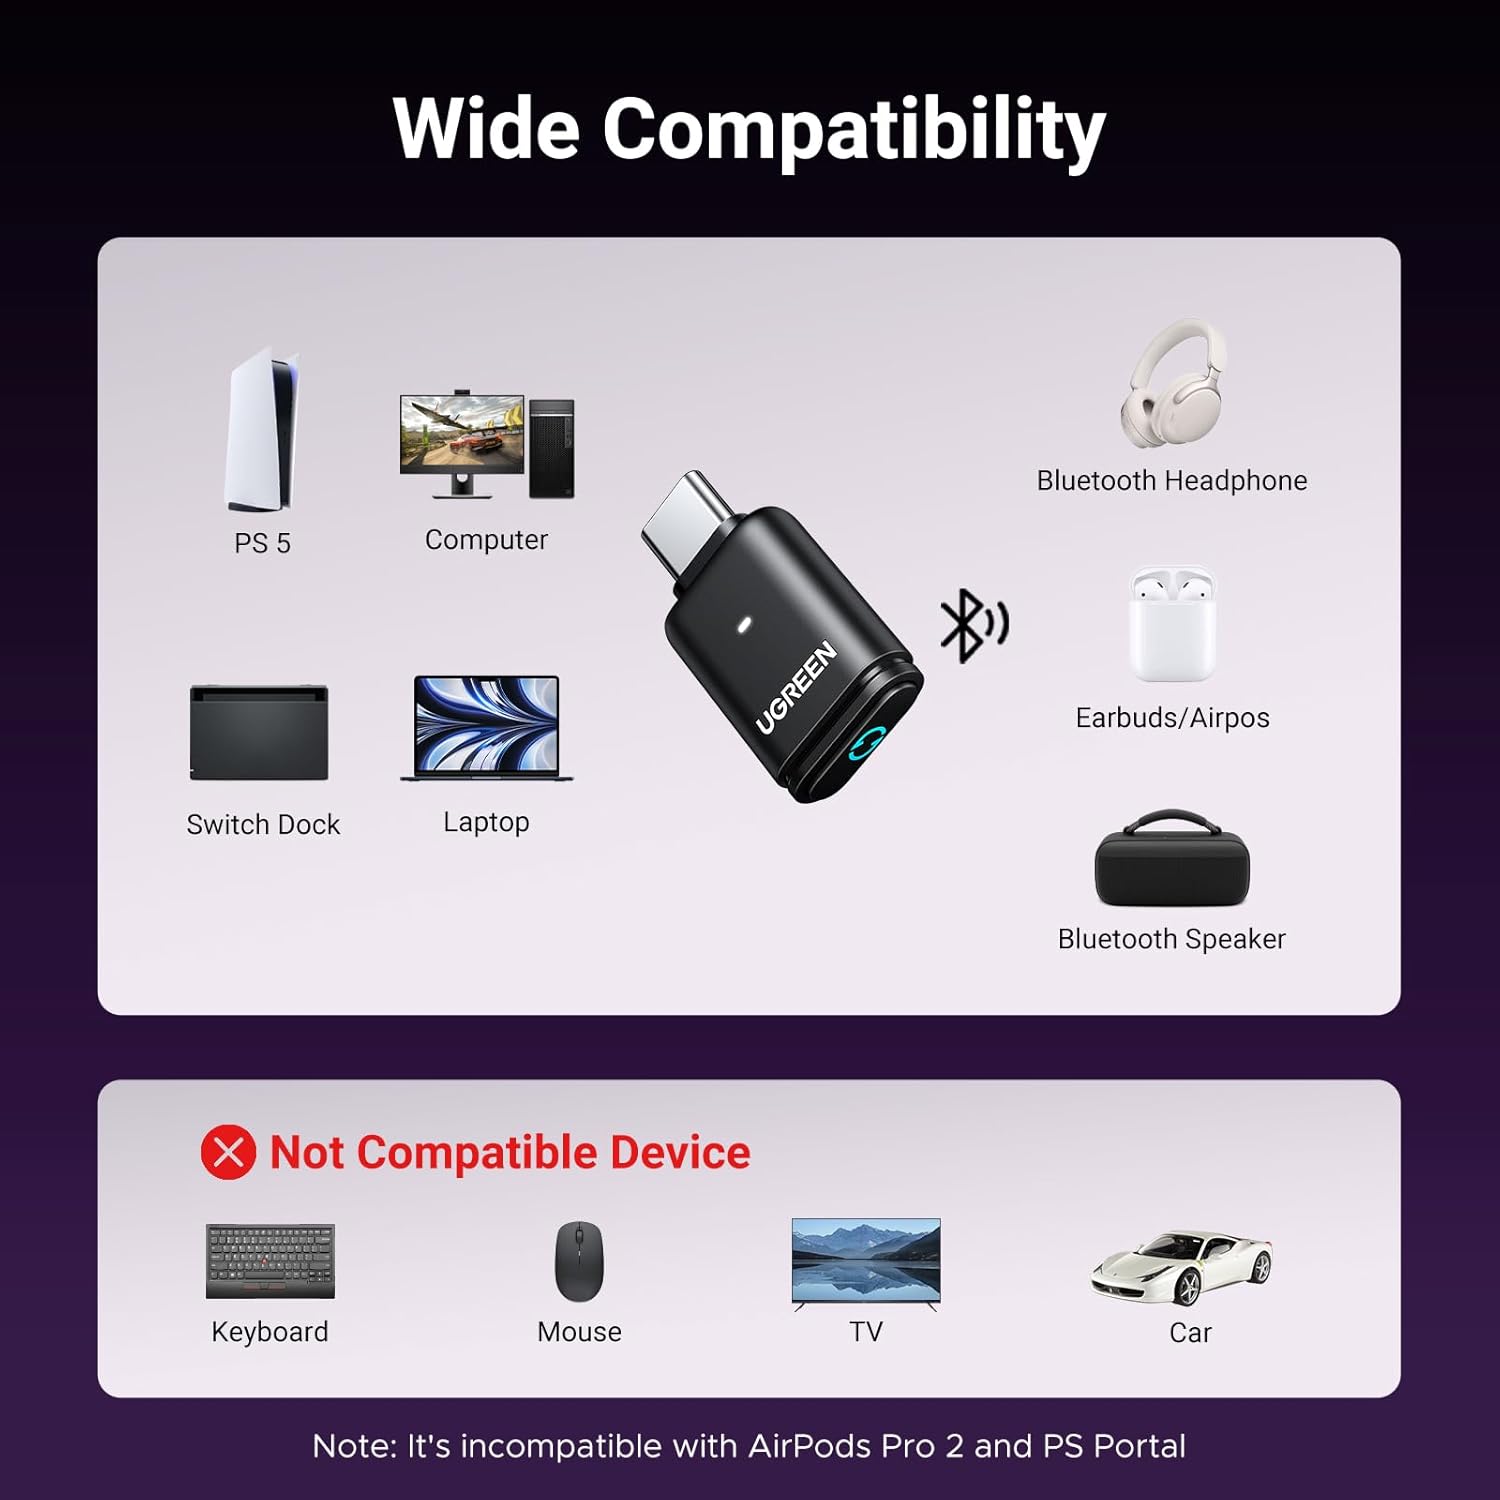
UGREEN USB-C Bluetooth Adapter for PS5
UGREEN USB-C Bluetooth Adapter for PS5, Bluetooth 5.3 Audio Adapter with APTX Low Latency & aptX-Adaptive, Wireless Audio Transmitter to Connect Wireless Headphones & Earbuds
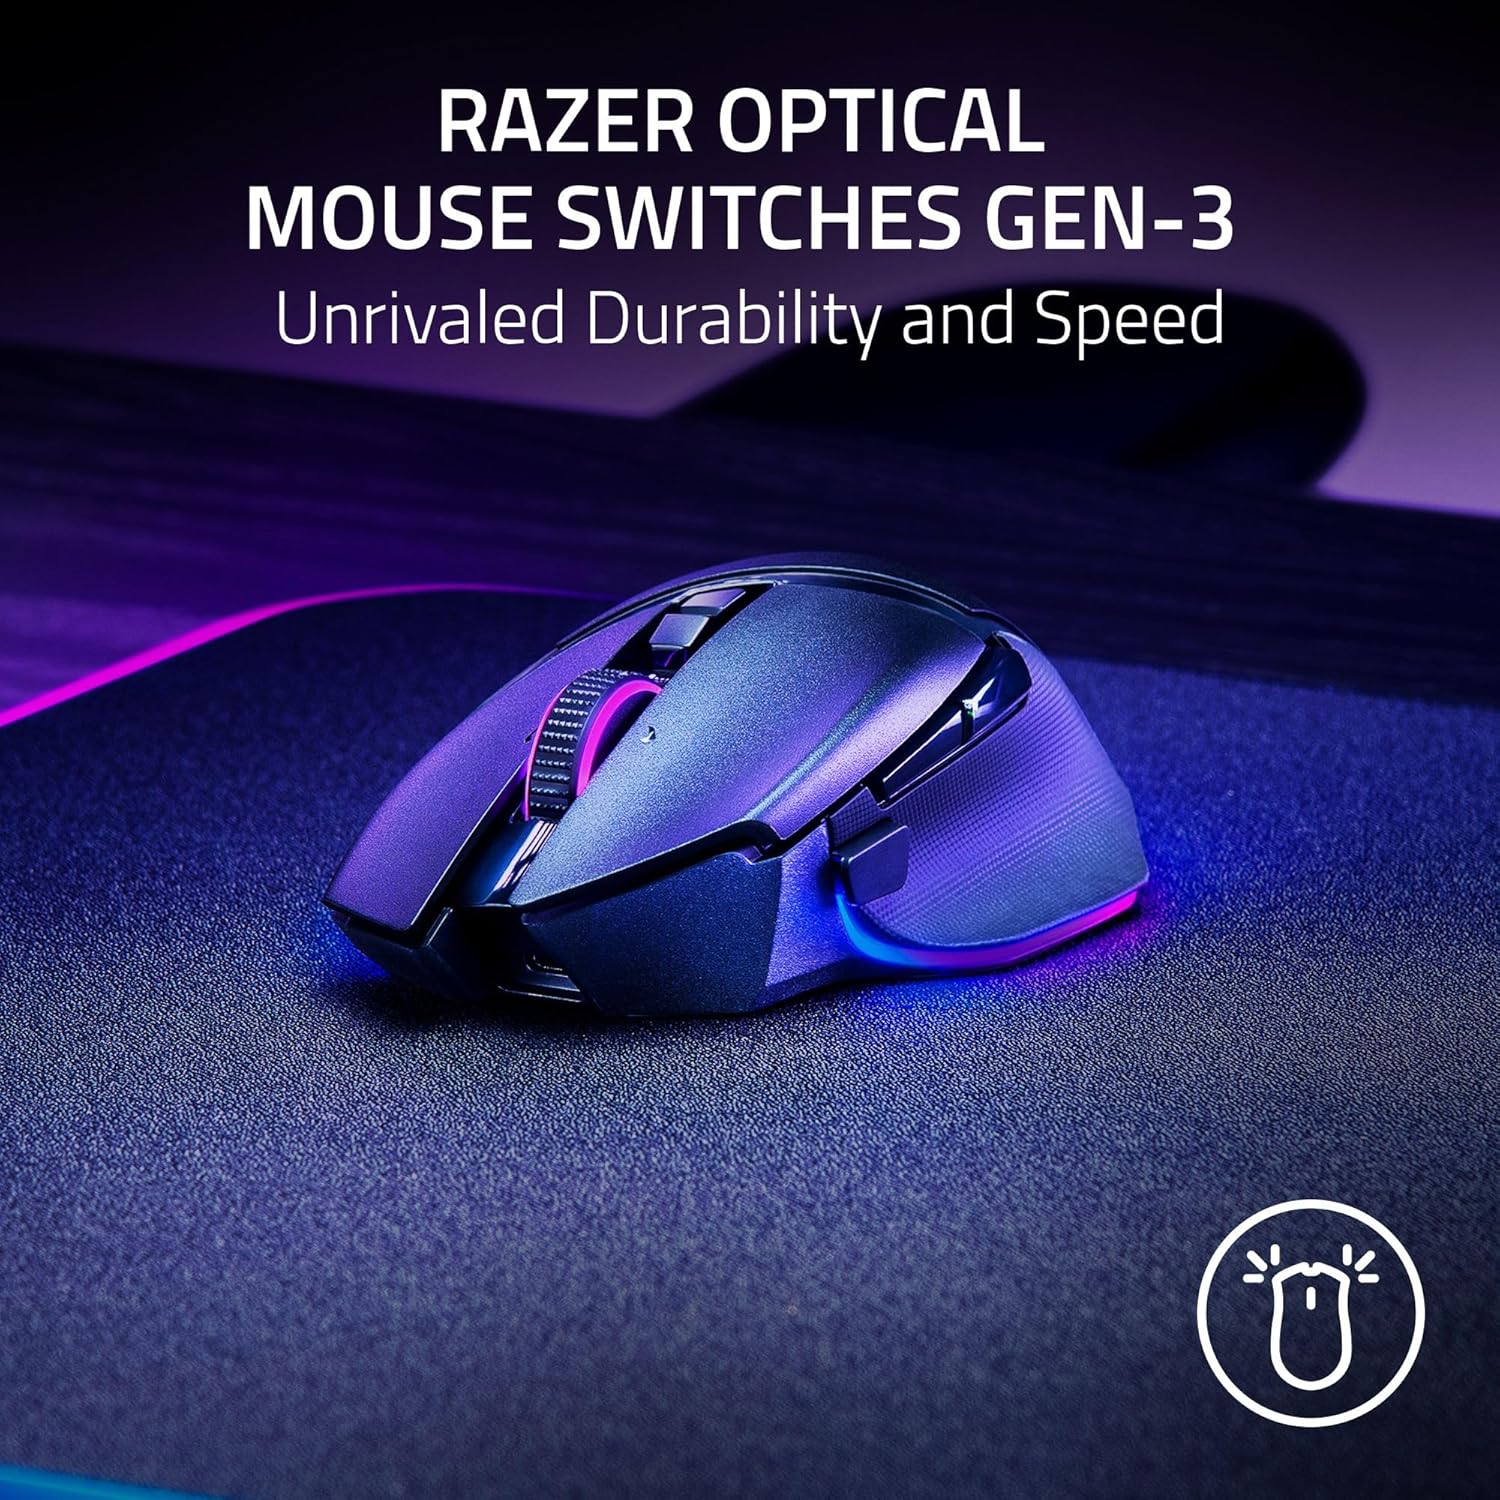
Razer
Razer Basilisk V3 Pro 35K Wireless Gaming Mouse: HyperScroll Tilt Wheel – 35K DPI Optical Sensor Gen 2-13 Customizable Controls – Chroma RGB – Optical Switches Gen 3 – Up to 140 Hr Battery – Black
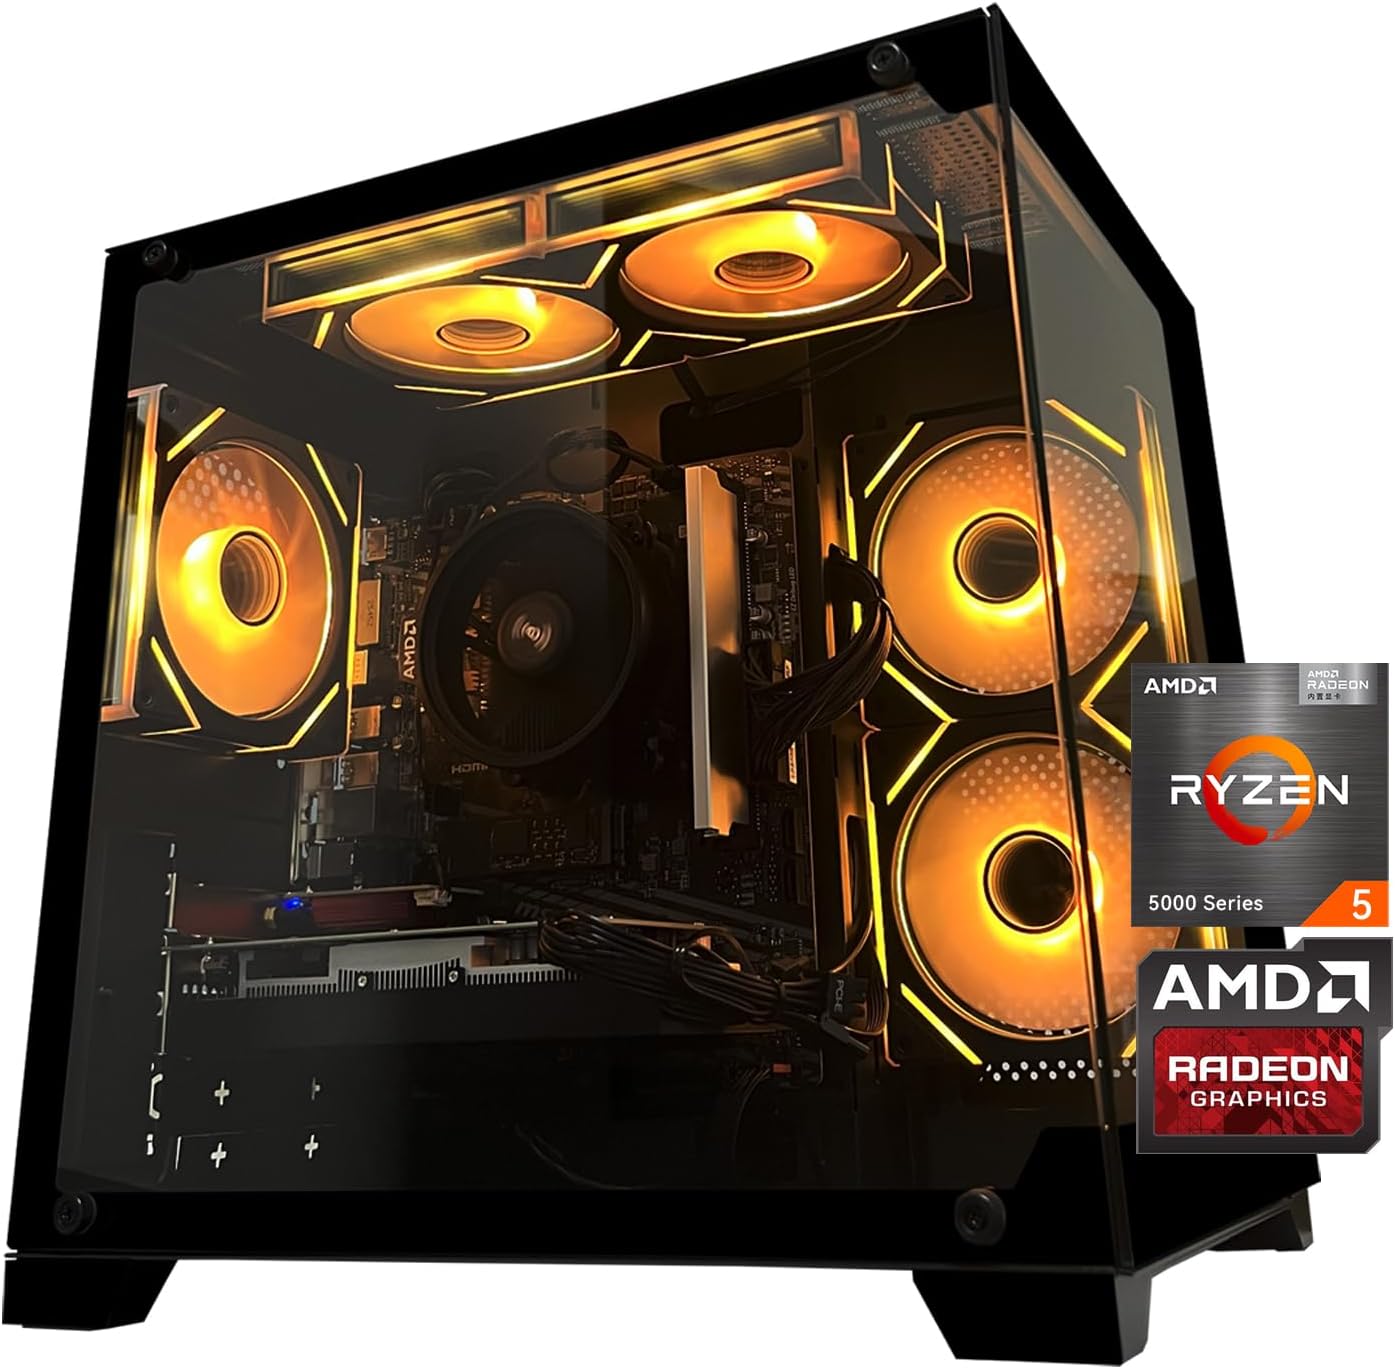
Gaming PC Desktop Computer, AMD
Gaming PC Desktop Computer, AMD Ryzen 5 5500, RX6500XT 4GB Graphics, 16GB DDR4 RAM, 512GB NVMe SSD, ARGB Fans, Game Design Office
Ultimate Mobile Controls – Plug & Play
Take your mobile game to the next level with this ready-to-use Mobile Controls Pack. customizable mobile controls without wasting days on UI and input setup. Perfect for 2D, 3D, FPS, RPG, Platformer, Shooter, and Casual mobile games.

NUBWO U3 Gaming Headset
NUBWO U3 Gaming Headset with Microphone, Safe Volume Limited, Kids Headphones for Switch, Super Lightweight, Rich Sound, 3.5mm Jack for NS, PS4, PS5, Xbox, Tablet, iPad Computer, Red

Vooii for iPhone SE
Vooii for iPhone SE Case 2022/3rd/2020,iPhone 8/7 Case, Upgraded Liquid Silicone with [Flat Edges] [Camera Protection] [Soft Anti-Scratch Microfiber Lining] Phone Case for iPhone SE – Black