
Getting Started with Audacity: Installation and Setup
Audacity is a free, open-source audio editing software that has gained popularity among podcasters, musicians, and audio enthusiasts alike. Its robust feature set and user-friendly interface make it a go-to choice for both beginners and seasoned professionals. This article will walk you through the installation and setup process, ensuring you’re ready to start creating high-quality audio content in no time.
Why Choose Audacity?
Before diving into the setup process, let’s explore why Audacity is a preferred choice for many:
- Free and Open-Source: You can download and use Audacity without any cost, which is perfect for newcomers.
- Cross-Platform: It runs on Windows, macOS, and Linux, making it accessible to a wide range of users.
- Extensive Features: From multi-track editing to sound effects, Audacity offers tools that cater to diverse audio editing needs.
- Community Support: A large user community means you’ll find plenty of resources, tutorials, and forums for help.
System Requirements
Before you install Audacity, ensure your system meets the following requirements:
| Operating System | Processor | RAM | Disk Space |
|---|---|---|---|
| Windows 7 or later | 1 GHz | 1 GB (2 GB recommended) | 100 MB |
| macOS 10.7 or later | 1 GHz | 1 GB (2 GB recommended) | 100 MB |
| Linux (varies by distribution) | 1 GHz | 1 GB (2 GB recommended) | 100 MB |
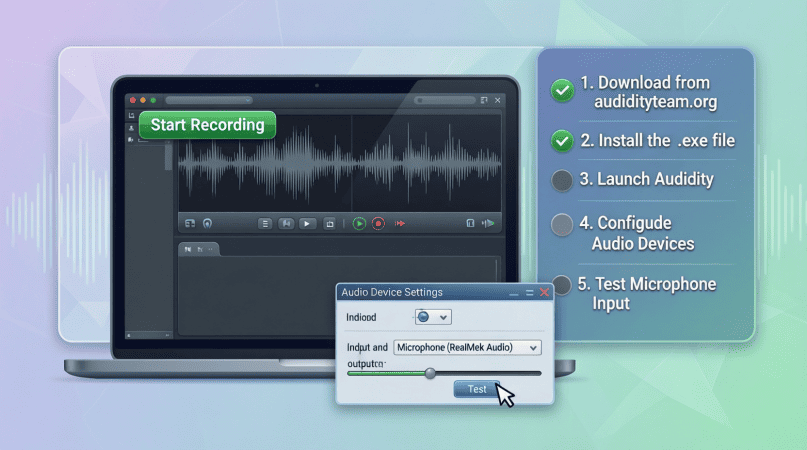
Step-by-Step Installation Guide
1. Downloading Audacity
To begin, you’ll need to download Audacity. Follow these steps:
- Visit the official Audacity website.
- Click on the download link for your operating system.
- Choose the latest version available for download.
2. Installing Audacity on Windows
Once the download is complete, follow these steps:
- Locate the downloaded .exe file and double-click it.
- Follow the installation wizard prompts.
- Select your preferred installation options and click Install.
- Once installed, launch Audacity from your Start Menu.
3. Installing Audacity on macOS
For macOS users, the installation process is as follows:
- Locate the downloaded .dmg file and double-click it.
- Drag the Audacity icon into your Applications folder.
- Open your Applications folder and double-click Audacity to launch it.
4. Installing Audacity on Linux
For Linux users, the process may vary depending on your distribution. Here’s a general guide:
- Open your terminal.
- Use your package manager to install Audacity. For example, on Ubuntu, you can run:
sudo apt-get install audacity - Once installed, you can launch Audacity from your application menu.
Initial Setup: Configuring Audacity
After successfully installing Audacity, it’s essential to configure it for optimal use. Here are the steps to follow:
1. Setting Up Audio Devices
Audacity needs to know which audio input and output devices to use:
- Open Audacity.
- Go to Edit > Preferences.
- Under the Devices tab, choose your preferred Playback and Recording devices from the dropdown menus.
- Click OK to save your settings.
2. Choosing the Audio Project Rate
The audio project rate affects the quality of your recordings:
- At the bottom left of the Audacity window, you’ll see a dropdown menu labeled Project Rate (Hz).
- Select a rate that suits your needs (44,100 Hz is standard for music).
3. Setting Up File Formats
To ensure compatibility with other audio software, configure your file formats:
- Return to Edit > Preferences.
- Click on the Import / Export tab.
- Choose your preferred file formats for importing and exporting audio.
Recording Your First Audio
Now that Audacity is installed and configured, it’s time to record your first audio piece:
- Connect your microphone to your computer.
- Open Audacity.
- Click the Record button (red dot) to begin recording.
- Speak or play your audio source.
- Click the Stop button (yellow square) when finished.
Congratulations! You’ve just recorded your first audio using Audacity. Experiment with various features, such as effects and editing tools, to enhance your project.
Final Checklist for Setup
Before you start working on your projects, ensure you’ve completed the following:
- Installed Audacity successfully.
- Configured audio devices in Preferences.
- Set the project rate appropriately.
- Configured file formats for compatibility.
- Completed a test recording.
Next Steps and Resources
Now that you’re set up with Audacity, you might be interested in exploring more advanced features and techniques. For a comprehensive guide on mastering Audacity, check out our resource: Mastering Audacity Online: A Comprehensive Guide. This guide will take you through various advanced editing techniques, effects, and tips to elevate your audio projects.
Conclusion
With Audacity installed and configured, you’re now ready to dive into the world of audio editing. Whether you’re creating a podcast, producing music, or just editing audio for personal projects, Audacity provides the tools you need to succeed. Remember, practice is key, so take your time to explore and experiment with the software. Happy editing!

Mouse Pad
BladeHawks Extra Large RGB Gaming Mouse Pad-14 Light Modes, Extended Soft LED Mouse Pad, Anti-Slip Rubber Base, Computer Keyboard Mousepad Mat (31.5 x 12 Inch)

Dreo Humidifiers for Bedroom
Dreo Humidifiers for Bedroom, 4L Top Fill for Large Room, 36H Runtime, 28 dB Quiet Supersized Cool Mist Air Humidifier for Baby Nursery, Plants, Indoor, Night Light, Easy to Clean & Fill, Black

NUBWO U3 Gaming Headset
NUBWO U3 Gaming Headset with Microphone, Safe Volume Limited, Kids Headphones for Switch, Super Lightweight, Rich Sound, 3.5mm Jack for NS, PS4, PS5, Xbox, Tablet, iPad Computer, Red