

How to Install Aseprite Extensions: A Step-by-Step Guide
What are Aseprite Extensions?
Aseprite extensions are additional scripts, tools, and features that enhance the functionality of the Aseprite application. They can help streamline your workflow, add new features, and improve your overall pixel art experience. For more information, check out our article on Aseprite Extensions: Enhance Your Pixel Art Experience.
Why Use Extensions?
- Efficiency: Automate repetitive tasks and speed up your workflow.
- Enhanced Features: Add new tools and functionalities that are not available in the default installation.
- Community Support: Leverage extensions created by other users to solve common problems or enhance your art.
Prerequisites for Installing Aseprite Extensions
Before you start installing extensions, ensure you have the following:
- A working installation of Aseprite.
- Basic knowledge of how to navigate your computer’s file system.
- Access to the internet to download extensions.
Step-by-Step Guide to Install Aseprite Extensions
Step 1: Download the Extension
1. Visit the Aseprite community forums or GitHub repositories where extensions are shared.
2. Choose an extension that suits your needs and download it. Most extensions will come in a .zip or .aseprite extension format.
Step 2: Extract the Files
1. If the downloaded file is in .zip format, locate the file in your Downloads folder.
2. Right-click on the file and select “Extract All…” to unpack its contents.
Step 3: Locate Your Aseprite Extensions Folder
1. Open Aseprite.
2. Go to Edit > Preferences (or press Ctrl + K).
3. Navigate to the Scripts tab. Here, you will find the path to your extensions folder.
Step 4: Move the Extension Files
1. Open the extensions folder in your file explorer.
2. Copy the extracted files from Step 2 and paste them into the extensions folder.
Step 5: Restart Aseprite
1. Close Aseprite completely.
2. Reopen Aseprite to load the newly installed extensions.
Testing Your Installation
After restarting Aseprite, you should be able to access your new extensions. Navigate to the File menu or the Extensions menu to find your newly installed tools. To ensure everything is working properly, try using one of the features from the extension.
Troubleshooting Common Issues
If you encounter issues with your installed extensions, consider the following:
- Extension Not Appearing: Ensure you placed the extension files in the correct folder and that Aseprite is restarted.
- Errors or Crashes: Check if the extension is compatible with your version of Aseprite. Some extensions may not work with older or newer versions.
- Read Documentation: Many extensions come with their own documentation. Consult this for specific installation or usage instructions.
Best Practices for Using Aseprite Extensions
To make the most of your Aseprite extensions, consider the following tips:
- Regularly check for updates to your extensions to ensure compatibility and access to the latest features.
- Participate in community forums to share your experiences and learn from others.
- Experiment with various extensions to find the best tools that suit your workflow.
Conclusion
Installing Aseprite extensions can greatly enhance your pixel art experience by providing new tools and features that streamline your workflow. By following this step-by-step guide, you can easily install and start using extensions that elevate your artistry. Happy pixel painting!

Vooii for iPhone SE
Vooii for iPhone SE Case 2022/3rd/2020,iPhone 8/7 Case, Upgraded Liquid Silicone with [Flat Edges] [Camera Protection] [Soft Anti-Scratch Microfiber Lining] Phone Case for iPhone SE - Black

Razer
Razer Basilisk V3 Pro 35K Wireless Gaming Mouse: HyperScroll Tilt Wheel - 35K DPI Optical Sensor Gen 2-13 Customizable Controls - Chroma RGB - Optical Switches Gen 3 - Up to 140 Hr Battery - Black
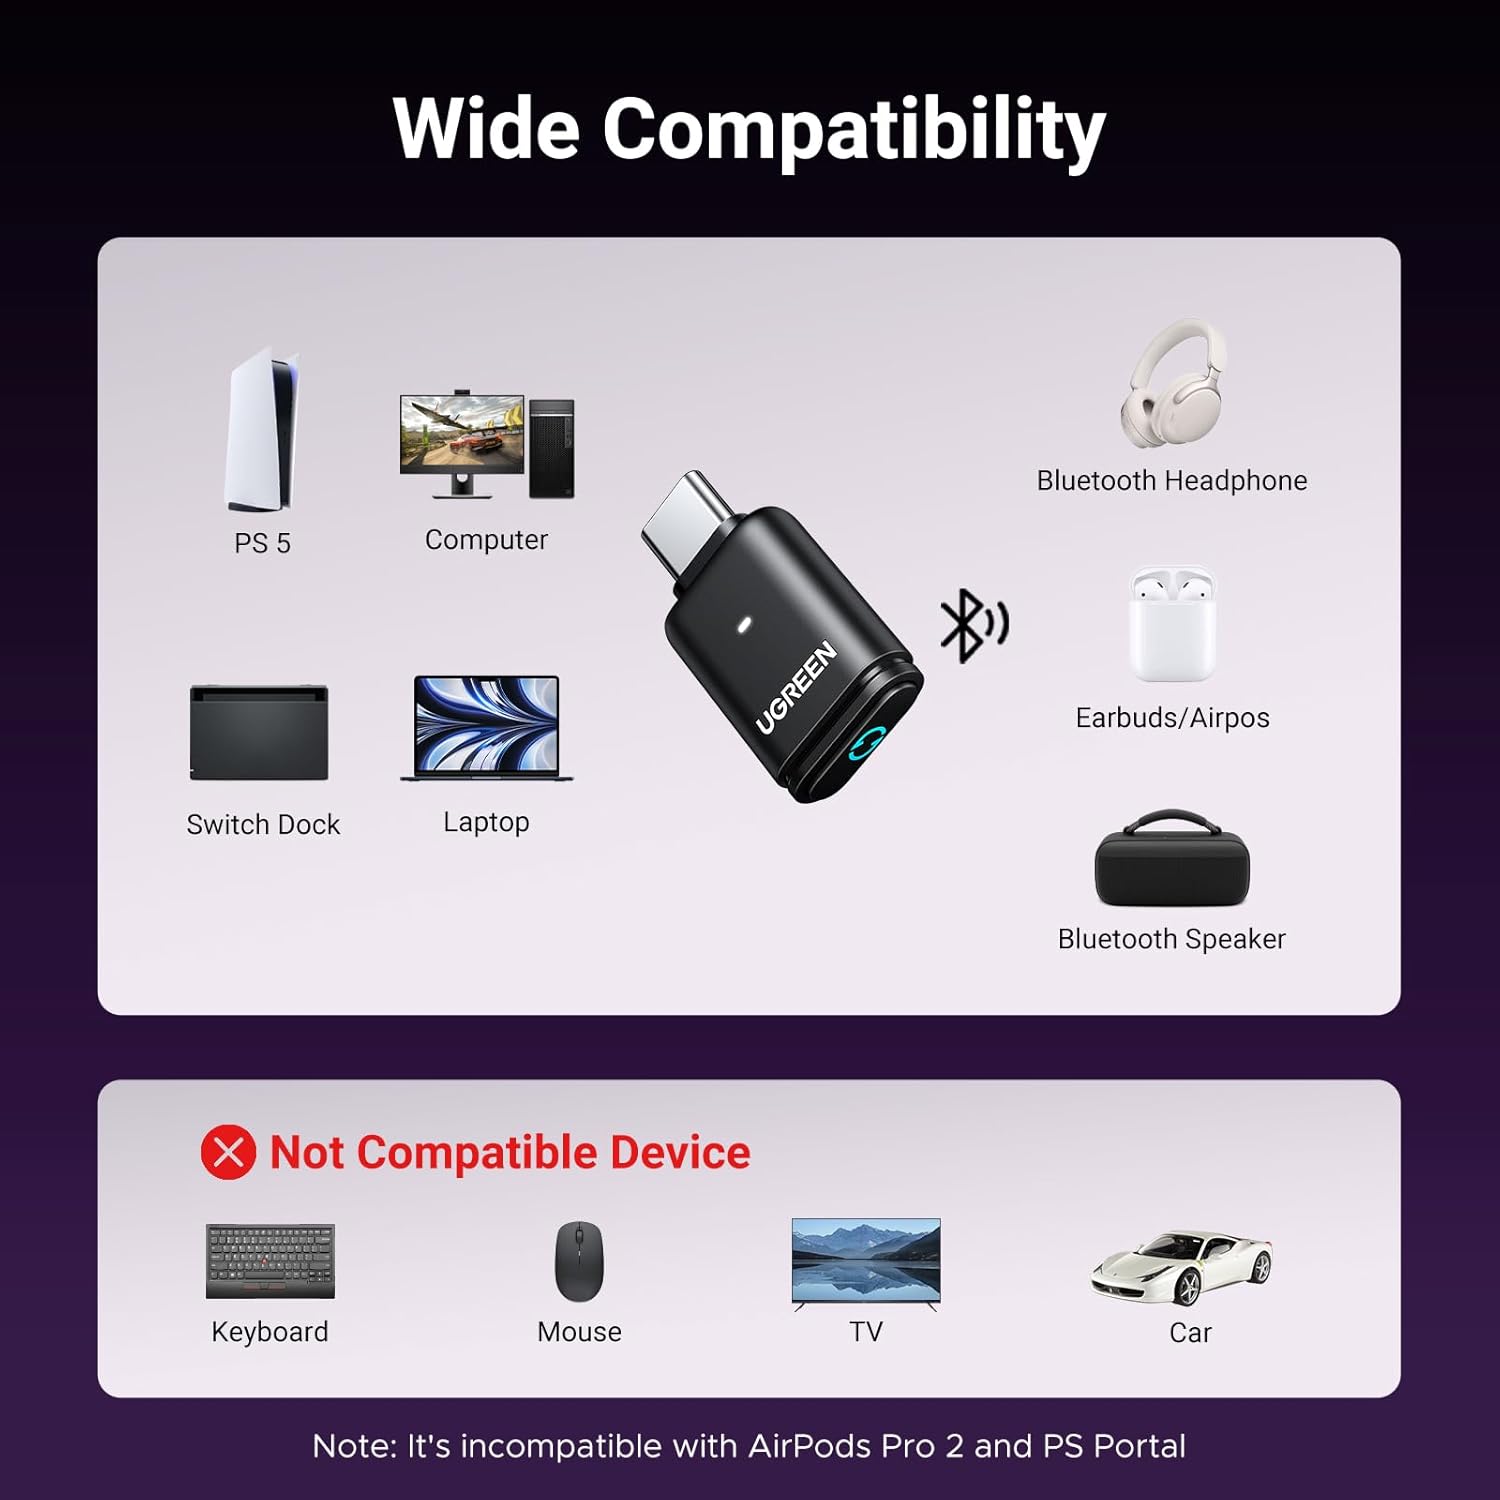
UGREEN USB-C Bluetooth Adapter for PS5
UGREEN USB-C Bluetooth Adapter for PS5, Bluetooth 5.3 Audio Adapter with APTX Low Latency & aptX-Adaptive, Wireless Audio Transmitter to Connect Wireless Headphones & Earbuds
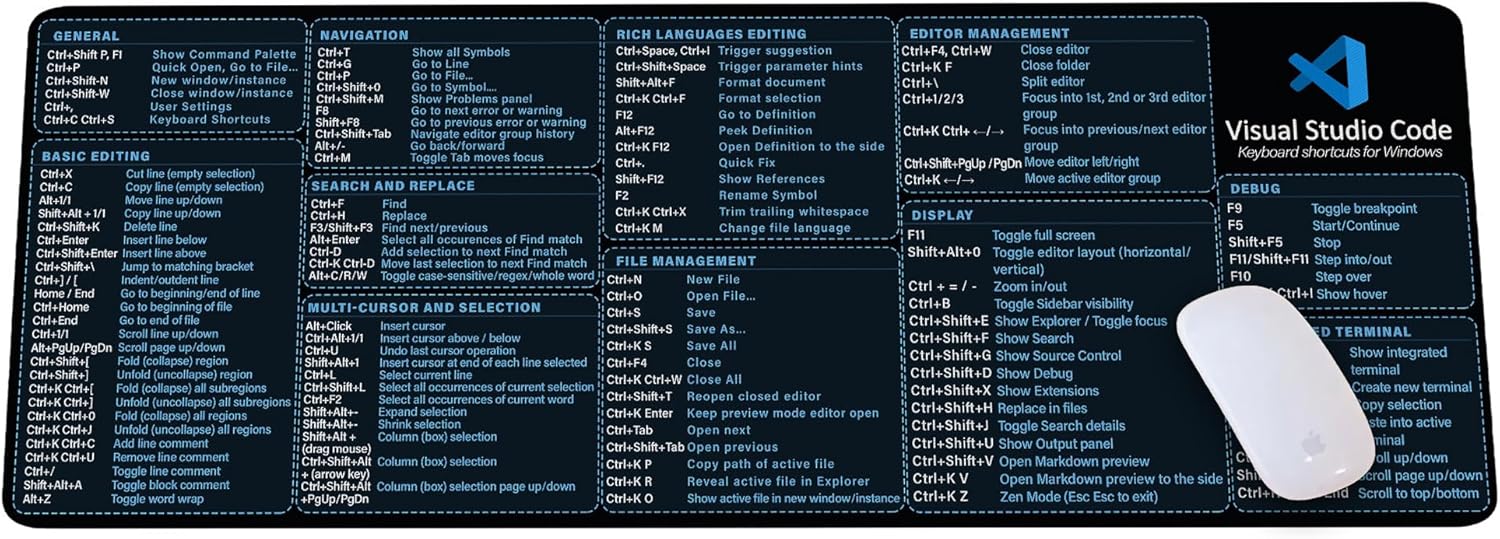
Visual Studio Code Shortcuts Mouse Pad
Visual Studio Code Shortcuts Mouse Pad – Desk Mat for Programmers, Coders & Beginners, Great Office Gift for Developers & Tech Enthusiasts, Computer Accessory for Study, Work, and Learning KMH